Tuesday, June 20, 2017

New Cover Up from New Look 6452

I had a cruise coming up and decided I wanted to make a new swim suit cover up. I also found some perfectly cute pineapple woven cotton at Hobby Lobby that I just had to do something with. Perfect combo!! So, of course I had to find a pattern to serve the purpose. The one I decided on was this one...

New Look Pattern 6452 Misses' Tops with Bodice and Hemline Variations

I decided on View B because I liked the lace variation around the hem and neck line. However, I also knew I wanted it to be longer, more of a tunic length rather than a shirt. So I decided to lengthen it by 3 inches after measuring my back length and comparing to finished garment length on the pattern envelope back.


This is how I lengthened it. There was no marking on the pattern pieces for a lengthen or shorten option, so I decided to use the waist line marking as my spot. I very carefully cut the pattern pieces for the bottom portion of the tunic on the waist marking. I then took some brown postal paper and cut a 4 inch strip to tape to the back. I usually use tissue paper, but I was out of that so I had to sub.


After lengthening the pieces I went ahead and cut out all of my pattern pieces. See what I mean about cute pineapple fabric.


After cutting out my pattern pieces I wanted to restore the pattern to its original length. So I took my PAPER scissors and very carefully cut the tape along the line to very easily remove the paper extension. 


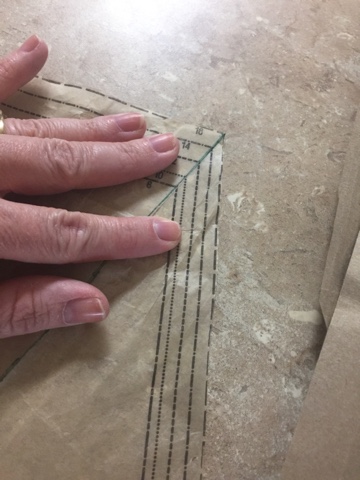
Then I carefully lined up the lines and taped it back together for future use. I only paid $1.99 for this pattern on sale, but I am incredibly cheap when it comes to patterns. Waste not want not.


I started assembling by attaching the interfacing to the collar pieces. I am lazy with this as well. 


I lay the interfacing down and then place the fabric on top to press it instead of using a pressing cloth. Ain't nobody got time for that. LOL


I did not want to set up my serger for this so I used an overcast stitch on my Brother sewing machine. My machine came with a snap on foot to do this, so why not? Setting up a serger is time consuming and as I previously stated, I was feeling like lay sewing.


This is what the stitch selection looks like on my machine.


This is what the foot looks like.

After finishing my edges prior to sewing I went ahead and started assembling everything. The pattern starts with the bodice which comes together very easily. After assembling the bodice it was time to attach my trim. I decided on a cute crochet edging with a fringe to it. I thought it looked kind of islandy.


I stitched right over the edge with a fabric matching thread instead of using white. I think it blended in better that way.


This is after attaching the trim to the bodice.


This is attaching to the bottom skirt edge prior to attaching the bodice to the skirt. The bodice and skirt came together super easy because there is practically no gathering. Score! All in all, if I had sat down and sewn it all at one time, It may have taken me 2-3 hours with pattern adjusting and cutting included in that time.

Here is my finished product on the lido deck on my cruise. I love how cute it turned out and it is super comfy.

Saturday, May 13, 2017

Another McCall 7542

Even though the contest is over, I still wanted to complete another version of this awesome pattern. This time, I made View A which has an exaggerated tulip sleeve, which I love! My hubby and I are heading out on a cruise in June and I wanted something fun and tropical for the occasion, so I chose a tropical shirting from Joann's and accented with a berry colored cotton covered piping I picked up at Hobby Lobby. I have also been participating somewhat in Me Made May by posting pics of things I have made for myself and I wanted to add something to that.


 I started cutting this out in my usual place, my kitchen. I am still waiting for my children to abandon a bedroom in order to have a sewing room. Eventually I guess.  My kitchen has been getting a lot of sewing time lately. My daughter has been sewing for her Disney trip to add to her Disney Bound wardrobe, I have been sewing when ever I have a spare minute, and my kitchen shows the signs.

Lots and lots of bits of fabric and thread all over the floor.

My kitchen table hasn't been eaten on in several weeks. LOL

The construction of this blouse went a little faster since I have made the basic shell portion previously. (See my previous post about this pattern.) The only difference on this one is that instead of lining it, I used the neckline facing. Since I wasn't adding a lining I did serge the edges of this blouse as well. Most of the pieces and seams I serged after construction. But for the sleeves I decided to serge the edges before I attached them since I was adding piping to the edges of the sleeve, and because it is a tulip sleeve which meant I would not have access to all seams after attaching them.


 To add the piping to the sleeves, I matched the unfinished edge of the piping with the serged edge of the sleeve. I then stitched very closely to the piping to make sure that it was a very close seam.
By sewing it in this way I ended up with what I felt is a more finished look to the sleeve.
This is prior to stitching, piping pinned in place, to show the effect I was going for.

This is after stitching showing how close the stitching is and the finished look.
This is me picking out the seam after I tried attaching it in a different manner and not liking the finished look.


 After attaching the piping I lapped the petals of the sleeve to get the tulip look that this view calls for. I love it because it is so cute and flirty. Keep in mind that basting is important when lapping the petals to keep them in place when you ease stitch and then when attaching.

The lapped petals creating the exaggerated tulip. So cute!

With the sleeves all constructed I attached them to the bodice portion of the blouse. It was so easy. With the sleeves attached I went ahead and tacked the facing to the shoulder seam. I just like the fact that this keeps it from folding up and bugging me when I am wearing it or after I wash it.

You can see the stitch in the ditch form the underside, but it completely disappears on the top.


Finished top out to lunch.

Aren't these sleeves fun?


 I received several compliments on this top while out and about in it today. I just love how fun it is. I also love that it was so easy to make. This particular pattern is such an easy construct that I highly recommend it to beginning sewists. The satisfaction from finishing it will definitely give the courage to continue on your sewing journey.

Saturday, April 29, 2017

McCall 7542

This is my post about my version of McCall 7542 for the contest that McCalls is running through their social media sites. I learned about it through their blog and on the Facebook group page.
I had already purchased this pattern as soon as the Spring line was released. I just love all the sleeve variations. I chose a white and blue laser cut eyelet from the Gertie line at Joann's. Being an eyelet it would need a lining. I went with a white muslin. I settled on view C with the pleated sleeves. I made it in a size 16 with a C cup.

I started with the lining first so I could make sure the fit was right. I used a blue, water soluble marking pen for all pattern markings. I wanted to make sure everything was where it should be. 


As you can see in these pictures, everything fell right into place.


This is the marking pen I use. On a light colored fabric I mark right through the pattern to make sure they are precisely where they should be.


This fabric has a printed scallop design on the border that I wanted to accentuate so I made sure to line up the pattern to allow for that.

 
Here is a picture of the markings through the pattern.


I hemmed the lining with a slightly deeper hem than called for so it would be shorter than my main fabric.


I also did a stitch in the ditch at the shoulder to hold the lining in place.


The pattern called for folding the  fabric and creating an encased edge before pleating. Since I wanted a lightweight sleeve and to showcase the border I only did half the width.


After cutting to length and marking, I practiced my machine's shell stitch on some scrap to get the right setting.


I settled on these settings for my Brother machine to get the right scallop.


This is the result. Very close and it worked great.


Then I changed the settings to do a scalloped hem on my main layer for the blouse.


This is my scalloped hem on my blouse before trimming.


I trimmed close to the stitched edge, but be careful not to clip your stitches.


Then I pressed my pleats and basted across the top. Look how pretty these pleats are!

Here is the pleated portion attached to the rest of the sleeve.


I love it!


Here is the finished blouse. (Please disregard the hot pink bra on Suzie my dressform.)


A close up on the sleeve.


This is the back. It closes with a hook and eye.


I love how quick and easy this pattern was to bring together. Seriously, the hardest part was pressing the pleats.


The sleeves are so fun and flirty. I especially like the lightweight feel of this material. It is totally necessary in the Texas humidity and heat.


I can't wait to make my second version of this awesome pattern. Next up will be view A with the tulip sleeve. Come on back y'all!