Monday, August 1, 2016

Second shirt dress

So, I mentioned before I was doing a sew along on McCalls Facebook page. I decided to use pattern 6696 and previously posted about the first draft of it  then. I liked the design except I did not like the extra fabric in the back. To much excess. So this time I took out some of the extra to reduce the poof. I laid the bottom portion of the back down and folded in on either side until it matched the top placket. It ended up being about 1 1/2 inches on each side. 

Once I had that accomplished I moved on to laying out my pieces on the fabric I had chosen.

This is from the Gertie line at Joann Fabrics. It's a beautiful cotton sateen and is just scrumptious! I also chose the clear faceted buttons so it had a little improvised sparkle when finished.


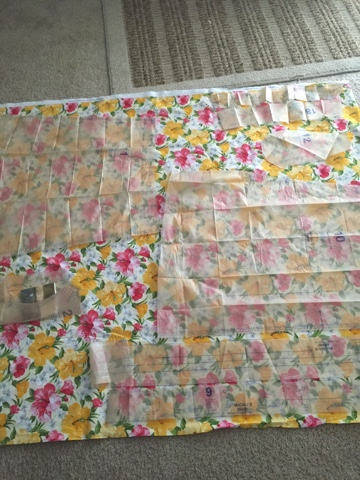
Here are the pieces laid out prior to cutting. I used my living room floor for extra space since I don't have a sewing room. I'm going to have to boot one of the kids out before I get that. They seem to be hanging around, so it may be awhile.

After I had it all cut out and was ready to sew tragedy struck. My youngest daughter let her friend use my favorite machine to stitch an Indian Princess dress...... And she broke it! The threading cassette wouldn't go in and the threader itself was bent. I was heartbroken! Dang kids! Think I'll have to cut her out of the will.

Thankfully, I have a back up machine, which is also a Brother, and I was able to get back to work. It took several weeks to get it together because we had our foundation repaired, flooring ripped up, new furniture delivered, and multiple lake trips that kept me from my machine. But, with a weekend finally available I decided to jump in. While starting to pin it I realized I wanted a little extra on this one. So I bought some rick rack for trim to bring out a pop of the pink. I think it worked. I trimmed the sleeves, collar, skirt bottom, and either side of the button placket. I really like the finished effect. 

I finished it today and I was worried it wouldn't fit because the waist looked really small during assembly. I was pleasantly surprised when I put it on and it buttoned right up. To finish the look I purchased a belt off of Amazon the matched the rick rack. I love the over all look and I'm glad I did the sew along.


Monday, June 13, 2016

Flamingos

I have a great fondness for flamingos. My kids might accuse me of being crazy about them. I have been looking at flamingo fabric for over a year now and trying to come up with a project to make with some. I found this fabulous flamingo border print at Joann's and knew I had to have it! 

Once I had my hot little hands on it I needed to decide what to make. What better thing to make than a skirt? It was a perfect idea for showing off this border print, especially since the top of the fabric has that cute striped border which is perfect for a waistband. I found a tutorial at Gertie's blog for better sewing here: http://www.blogforbettersewing.com/2009/08/sew-full-gathered-skirt-part-one-make.html?m=1
I loved the fullness and the easiness of creating the pattern (just some rectangles). 

I washed my fabric before starting because I wanted to make sure there would not be any shrinking after construction. I then made my pattern from brown packing paper because it was what I had on hand. I wouldn't recommend it because it was pretty stiff and kept trying to curl up from being on the roll. But, it worked out ok for me. 

After cutting out my super easy rectangles, I serged all my edges to finish them.


 Then I gathered the upper edge before I was going to attach the waistband. I applied fusing interfacing to one waistband piece and attached the two pieces at the top. Then I attached the fused side to the gathered edge of my skirt.


After attaching there, I hand stitched the other side down to conceal the gathered edge. Don't try to cheat here. The hand stitching is vital for a finished look to the skirt.


After finishing the waistband I inserted the invisible zipper. I am not a fan of invisible zippers. I'm still trying to find a method I like. So far, no luck. I just muddle through until I figure it's good enough. 

The final part was the hem. I decided to use the blind stitch setting on my machine. I wanted to make sure my hem stitching would not detract from my border print. So, it's all done and I am really happy with how it turned out. I can't wait to wear it with the cute flamingo scarf I bought a few weeks ago! I hope you like it as well!
Thanks for stopping by!


Wednesday, May 25, 2016

Sew-a-long Shirt dress practice


I joined a sew along from the McCall Blog a few weeks ago. The idea was to make a shirt dress using a McCalls, Butterick, or Vogue pattern. I have been wanting to make one for some time now and this was a perfect excuse. I chose McCall 6696 doing view B. 

Looks easy enough, right? 

I started out with the plan to do a sloper/muslin/practice dress out of a cute print my Mom picked up for me. (Thanks Mom)


I love how summery this fabric looks!

After washing and ironing the fabric, I was ready to start cutting. My space can be limited sometimes and so is my family time when teenagers actually want to be around, so my cutting location was not ideal (my living room floor), but it got the job done and I got to talk to the kiddos while doing it. 


After cutting out the pieces and marking all my circles, squares, etc. I used my dressform to fit the pieces and make sure it was going to work out. 
I pinned darts in place according to markings. Then I pinned pleats in place and attached skirt to bodice.

According to my pinning, I was good to go. So I set to putting my fabric under my needle and making magic. I followed the pattern instructions and started with the bodice. It came together pretty easily, even with the faced back on the upper bodice back. (Think of the upper back of a mans dress shirt and how it's two layers of fabric.)


Not a lot of gathering needed for the sleeves, which I like. However, there is gathering on the back. Once I had the dress all together I decided the gathering is too much, so on the next one I will decrease the width of that panel so as to decrease the gathered material.

Another problem I ran into was the amount of material going through my serger in the gathered areas. My serger is not a heavy duty one and kept getting jammed, resulting in three broken needles. After the third I gave up and switched back to my regular Brother machine and then used pinking shears to finish the edges after sewing. This is a quick way to finish edges when serging is not an option.

The skirt does have pleating which gives you a nice full skirt bottom, but be careful when you pin and press. Make sure you are lining up according to the pattern markings and be sure to baste it. Basting may seem like a waste of time, but it is definitely worth it!

After basting the pleats in place and sewing the pockets in place I finished assembling the skirt. This pattern calls for you to hem the skirt before attaching to the bodice. This definitely makes it easier I think. 

Here is the finished dress. I think it turned out well. I added yellow buttons and a yellow ribbon for a belt. On the next one I will lengthen the back length a bit because I felt it hit too high on my waist. But that may be just me. 


My next post will be after finishing the final dress for the sew along. Happy Sewing!!


Sunday, January 24, 2016

Weekend project----FINALLY!!!

It seems like it has been forever since I was able to take the time to sew. Maybe because it has been. Finally, this weekend I was able to get around to making an outfit that has been waiting to be constructed since September. It felt good to get the creative juices flowing again. 

My outfit started when I found a pretty brown tweed at Hancock Fabric that was  on sale. Once I had the fabric in mind I decided it would make a really cute skirt. That meant I needed to make a blouse to go with it. So, I found a nice earth tone paisley that looks great with the tweed. 

I already had two patterns at home that would work great for my imagined outfit. I used McCall M6035  view B for the blouse and Simplicity 5914 view B for the skirt. They worked out great! Both are fairly easy patterns to follow, and the blouse is customizable according to your cup size. Perfect! 

It took me all day today (2:00pm - 12:30am), but it was worth it. That includes breaks for food, chats with friends, and checking Facebook, LOL.

So, without further ado, here are pictures of my weekend project.